Editing and data compilation > Common editing tasks
Common polygon editing tasks |
|
|
Release 9.3
Last modified May 14, 2009 |


Print all topics in : "Common editing tasks" |
Creating adjacent polygons
If you are creating polygons of land uses, soils, counties, or property ownership, for example, you often need to create polygons next to one another. The polygons should share a border, but you want to avoid digitizing the border twice or having overlaps or spaces between polygons. You can use the Auto-Complete Polygon task when creating new polygons to help ensure that your data forms a continuous fabric.

The task below is used to create new polygons in empty spaces rather than splitting existing polygons.
- Set the target layer to the polygon layer into which you want to create new features.
- Set the edit task to Auto-Complete Polygon.
- Click the Sketch tool
 .
.
- Construct the sketch for the new polygon feature. The sketch must cross or intersect the existing polygon edge at least two times for the new polygon to be created.
- Finish the sketch.
Creating polygons from lines
If you have line features, you can create polygon features from them. For example, you might need to create parcel polygons from lot lines, lakes from shorelines, street polygons from pavement lines, and so on.
There are several ways you can use line features to create polygon features. You can create a brand–new polygon feature class, or you can interactively create polygon features in an existing feature class.
The tasks below are used to create new polygons in empty spaces rather than splitting existing polygons. If you need to create new polygons by splitting them at lines, see the "Splitting a polygon by an overlapping line feature" task on this topic.
Creating a new polygon feature class
If you have an ArcEditor or ArcInfo license, you can use the Create Polygons From Lines command in ArcCatalog. In addition, with an ArcInfo license, there are several geoprocessing tools you can use. The most common one is the Feature To Polygon tool, in the Data Management toolbox > Features toolset. If you want to convert CAD lines to polygons, you can use the CAD Lines To Polygon Features tool from the Samples toolbox > Conversion toolset.
Learn how to use the Create Polygons From Lines command in ArcCatalog
Learn how to use the Feature To Polygon tool
Creating polygon features in an existing feature class interactively
With an ArcEditor or ArcInfo license, you can use the Construct Features command on the Topology toolbar to create polygons from lines in ArcMap.
Learn how to use the Construct Features command in ArcMap
Splitting a polygon by an overlapping line feature
If you have a line feature that crosses a polygon, you can use the line to split the polygon—for example, if you want to divide an administrative boundary at a road or river.
If you have an ArcEditor or ArcInfo license, you can use the Construct Features command:
- Select the line feature or features you want to use to split the polygon.
- Set the target to the polygon layer.
- Click Construct Features
 on the Topology toolbar and choose Split existing features in target layer using selection.
- Select the polygon.
- Set the task to Cut Polygon Features.
- Click the Sketch tool .
- Right-click the line and click Replace Sketch. This lets you see the line's vertices and segments as an edit sketch.
- Finish the sketch (you can press F2 so you don't inadvertently add more segments to the sketch when you finish it). The polygon is split where the line crosses it.
Editing shared boundaries
Polygon features often form a continuous fabric. If you're mapping parcels, soils, administrative zones, or land uses, you'll frequently need to modify shared edges or polygon borders. For example, you may need to edit the boundary between urban and agricultural land-use zones as development occurs.
To work with shared geometry, you will need to have a map or geodatabase topology on your data. Then, you can select edges and nodes that may be shared by more than one feature, modify them, and update all the features that share the node or edge.
- Create either a map topology or a geodatabase topology on your data.
- Click the Topology Edit tool
 on the Topology toolbar.
- Use it to select and manipulate the shared edges and nodes.
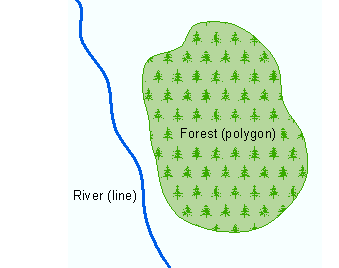
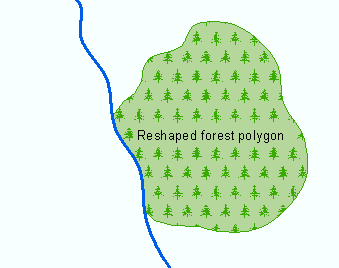
Reshaping a polygon
You can reshape a polygon to reflect a change in an area's boundary, align with another line or polygon, or match an object in an image. For example, a polygon representing a national park's boundary can be updated and enlarged after additional land is acquired for the park.
-
Build a map topology in which the polygon feature class you want to reshape participates.
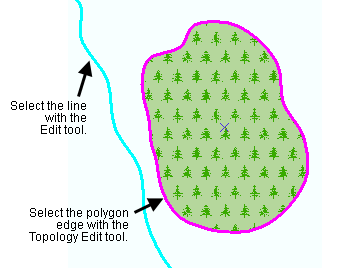
- Use the Topology Edit tool to select the polygon edge to be reshaped. The selected edge is shown in magenta.
- Set the task to Reshape Edge.
- To reshape a polygon by sketching or drawing over an image, just use the Sketch tool to draw a sketch of the reshaped line.
- To reshape a polygon to match another feature, such as a line, you can use the Trace tool to draw a sketch. The following steps will work when the existing feature overlaps the polygon you want to reshape:
a. Use the Edit tool - Make sure that the sketch intersects or completely crosses the polygon at least two times so the reshape can be completed.
- Finish the sketch.
b. Click the Trace tool
c. Click the selected line feature (the one selected in cyan) and trace along it. Click when you're done tracing.
-
Open the Snapping Environment dialog box and turn on edge snapping for the line layer.
-
Build a map topology in which the polygon feature class you want to reshape participates.
- Use the Topology Edit tool to select the polygon edge to be reshaped. The selected edge is shown in magenta.
- Use the Edit tool
 to select the line along which you want to trace. It will be shown in cyan.
- Set the task to Reshape Edge.
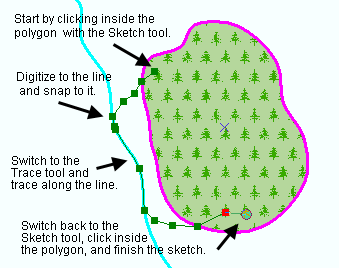
- Click the Sketch tool , click inside the polygon, and digitize between the polygon and line.
- Snap to the line and click it once.
- Without finishing the sketch, change to the Trace tool
 and trace along the selected line.
- Click once where you want the trace to end.
- Without finishing the sketch, change back to the Sketch tool.
- Sketch in the remaining shape between the line and the polygon.
- Click inside the polygon and finish the sketch.
Creating and editing multipart polygons
Multipart features are composed of more than one physical part that only references one set of attributes. For example, the individual islands that make up Hawaii are often represented as a multipart polygon feature. You can create, edit, and work with multipart features using editing tools as well as geoprocessing tools.
Here are some of the common tasks performed when working with multipart features:
- To create a new multipart feature, create a sketch of the first part, right-click, and click Finish Part. Draw the sketch of the next part, and finish the sketch when you are done creating all the parts. (A shortcut to the Finish Part command is to hold down the Shift key and click.)
- To add a part to an existing polygon, double-click it with the Edit tool. Right-click and click Finish Part, then sketch the next part and finish the sketch when you're done.
- To create multipart features from existing polygons by aggregating them based on attributes, you can use the Editor > Merge command (produces multipart polygons when the selected polygons are not contiguous) or the Dissolve geoprocessing tool and specify the output as multipart polygons.
- To remove a part from an existing multipart feature, double-click the feature with the Edit tool, then click the Sketch Properties button
 on the Editor toolbar. On the Edit Sketch Properties dialog box, click the part you want to remove, right-click it, and click Delete. Finish the sketch when you're done.
- To separate parts into individual polygon features, you can select them and use the Explode tool on the Advanced Editing toolbar. You can also run the Multipart To Singlepart geoprocessing tool.
Keep in mind that parts in a multipart polygon are spatially separated. They can touch each other at vertices, but they cannot share edges or overlap. When you are sketching a multipart polygon, any parts that share an edge will be merged into a single part when you finish the sketch. In addition, any overlap among parts will be removed, leaving a hole in the polygon.
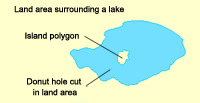
Creating new donut holes and island polygons
Sometimes you need to create a polygon with a hole in it or even a polygon with both a hole and an interior polygon. To create these kinds of polygons, you need to create a multipart feature.
When you create a polygon with an island inside it, the outer and inner areas are all one feature. This means that clicking either polygon will select both of them, and the attributes of the feature are stored in just one row in a table.
Donut polygons are commonly used with administrative boundaries. For example, a city may have unincorporated areas within its limits or school districts may have holes or discontinuities. Islands might be useful for mapping land covers or habitats such as where two groups of similar trees are separated by a grassy area or there is land mass surrounding a water body that has islands in it.
In the graphic below, the land mass has a donut hole (where the lake is) cut in it, then an island polygon is inside the hole. The lake polygon has a donut hole (where the island is) cut in it as well.
- Set the target layer to the polygon layer.
- Set the task to Create New Feature.
- Click the Sketch tool .
- Digitize the outer boundary of the polygon, then hold down the Shift key and click. This is the same as right-clicking and clicking Finish Part.
- Click inside the polygon and sketch the inner boundary.
- If you are creating a donut polygon, finish the sketch. To create an island, finish the part and create another sketch inside the hole, then finish the sketch.
Cutting donut holes in existing polygons
You can cut holes in existing polygon features to create a donut polygon.
-
Open the Snapping Environment dialog box and turn on snapping for edit sketch vertices. The check box is at the bottom of the dialog box. With edit sketch snapping, you can better construct a closed boundary defining the area you want to remove.
- Set the task to Cut Polygon Features.
- Click the Sketch tool .
- Sketch the area you want to remove. Make sure the end vertex snaps to the first one, so you end up with a closed polygon.
- Finish the sketch.
- You now have two polygons. Select only the inner polygon and press the Delete key.
- Select the inner polygon.
- Click the Editor menu and click Clip.
- Set the buffer distance to 0 and choose to discard the area that intersects.
- Click OK.
- Delete the inner polygon.
Filling in donut holes in polygons
To fill in the hole completely by incorporating the void into the outer polygon, use the following method:
- Double-click the polygon containing the void.
- Click the Sketch Properties button on the Editor toolbar.
- Select the part number that corresponds to the void.
- Right-click the part number and click Delete.
- Click Finish Sketch to fill the void.
- You could trace in a new feature.
- Select the polygon containing the void.
- Set the task to Create New Feature.
- Set the target to the polygon layer in which you want to create the new feature.
- Click the tool palette drop-down arrow and click the Trace tool .
- Press the O key and make sure the offset is set to 0.
- Click to start tracing, then click to stop after you've traced completely around the void.
- Finish the sketch to create the new feature.
- You could turn on edge and vertex snapping for the polygon layer containing the void and use the Sketch tool to digitize a new feature inside the void.
- You could use the Auto-Complete Polygon task and draw a sketch across the void. This will create two new features in the void, which you could then merge.
- You could copy and paste the feature, then delete the outer part of the new feature, leaving only the interior. (This method works if the void is entirely contained within one polygon rather than at the border of two adjacent polygons.)
- Set the target to the polygon layer in which you want to create the new feature.
- Select the polygon containing the void.
- Copy and paste the polygon. The new polygon is pasted directly on top of the old one and is selected. You can look at the attribute table to confirm you have the new polygon selected.
- Change the task to Modify Feature.
- Click the Sketch Properties button on the Editor toolbar.
- Select the part number that corresponds to the outer polygon.
- Right-click the part number and click Delete.
- Click Finish Sketch.
- If you have many voids to fill in with new features and want to do them all at once, you could set up a geodatabase topology with a Must Not Have Gaps rule. Using the Error Inspector
 or the Fix Topology Error tool
  , select all the errors caused by voids in the polygons, right-click, and click Create Feature.
Removing overlap from existing polygons
If you have overlapping polygons that you want to make coincident or adjacent, you can clip out the overlapping portion. When using this method, keep in mind that all editable features underneath the feature you are using to clip with will be clipped.
- Select the polygon feature whose border you want to maintain. The other polygon will be clipped back to match it.
- Click the Editor menu and click Clip.
- Set the buffer distance to 0 and choose to discard the area that intersects.
- Click OK.
Removing slivers or gaps between polygons
Tiny sliver polygons or gaps between polygons often result from creating new polygons without using snapping or editing shared boundaries without a topology. Slivers and gaps keep your dataset from forming a continuous fabric and should be identified and fixed as appropriate.
With an ArcEditor or ArcInfo license, you can set up a geodatabase topology. Geodatabase topology is the most efficient, automated, and thorough means of finding and fixing these errors. You can apply Must Not Overlap and Must Not Have Gaps rules to find polygons that either overlap each other or have gaps between them. You can also look for Must Be Larger Than Cluster Tolerance errors, which are polygons small enough to collapse during the process of validating the topology.
Without the ability to use geodatabase topology, there are several general ways you can find and fix these errors:
- You can run the Check Geometry and Repair Geometry tools, which can help find and fix short segments, null geometry, and other problems that could result in sliver polygons.
- You can use the Integrate geoprocessing tool to make polygon edges and vertices coincident. Integrate can help fix both slivers and gaps. However, you need to be careful that you enter the smallest cluster tolerance possible so you don't inappropriately collapse or merge features.
-
Turn on edge, vertex, or end snapping and modify polygon edges and vertices manually using the editing tools.
- You can perform a Select By Attributes query for polygons that have an area smaller than a certain size, depending on your dataset. You can inspect the selected polygons to see if they are slivers, then use either the Editor > Merge command or the Eliminate geoprocessing tool (requires an ArcInfo license) to merge the slivers with neighboring polygons.
- Try the Zipper Task developer sample, available from edn.esri.com, to help with both slivers and gaps. The Zipper edit task allows features within a tolerance you specify to be snapped to an edit sketch. It's most useful when you need to fix braided, overlapping slivers that generally follow the same boundary trends but aren't coincident—for example, a river and a state or country boundary or an administrative boundary and a school district. If your datasets were collected at different resolutions, the Zipper task can help snap the lower-resolution edge to the edge of the higher-resolution data.
Creating polygons from other polygons
You can create polygons from existing polygons by combining polygons in one or more layers. This function is especially useful when your features share common attributes. For example, if you have a parcels layer, you can combine its features to create a subdivisions layer.
You can merge two or more polygon features in the same layer to create a new polygon feature. If you have two or more polygon layers, you can aggregate them into one layer.
The Merge and Union commands on the Editor menu create features in an existing feature class, whereas the Merge and Union geoprocessing tools create features in a new feature class.
Learn how to use the Merge command
Learn how to use the Merge geoprocessing tool
Learn how to use the Union command
Learn how to use the Union geoprocessing tool